

Last updated on March 5th, 2024 at 11:56 am
8 Tips for Screen Printing Perfection Projects
Here are step-by-step detail guides for perfection in screen printing projects.
1. Choose the Right Fabric and Ink
Understand the fabric and its texture quality, ensuring it matches the chosen ink. Consider the fabric color and select high-quality, colorfast inks for vibrant, long-lasting prints.

Step 1: Assess the fabric composition and texture to ensure compatibility with the chosen ink type.
Step 2: Consider the color of the fabric and its impact on the final print.
Step 3: Choose high-quality, colorfast inks suitable for the fabric type to achieve vibrant and durable prints.
Cost Consideration
Evaluate the Screen Printing cost per Shirt by factoring in the chosen fabric and ink quality.
2. Optimal Screen Tension
Regularly check and adjust screen tension to avoid blurring and inconsistencies. Consistent tension across screen enhances print quality, reducing the need for reprints and minimizing costs.
Step 1: Regularly check and adjust screen tension using a tension meter.
Step 2: Tighten loose screens to prevent blurring and inconsistency in prints.
Step 3: Maintain consistent tension across all screens for uniform results.
Advantage
Proper screen tension enhances print quality, reducing the need for reprints and minimizing Screen Printing shirt cost.
3. High-quality screens and Mesh
Invest in fine-mesh screens for detailed designs. Choose mesh counts based on design intricacy and replace screens with worn-out mesh. High-quality screens keep you on-trend with the latest screen printing styles.
Step 1: Invest in screens with fine mesh for detailed designs and high-resolution prints.
Step 2: Choose the appropriate mesh count based on the intricacy of your design.
Step 3: Replace screens with worn-out or damaged mesh to maintain print quality.
Trend Note
High-quality screens contribute to staying on-trend with the latest Screen Printing trends.
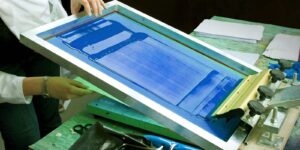
4. Master the Art of Screen Coating
Use quality emulsion suitable for your needs. Apply emulsion evenly on both sides of the screen, allowing sufficient drying time for proper stencil development.
Step 1: Use a quality emulsion suitable for your printing needs.
Step 2: Apply the emulsion evenly on both sides of the screen using a coating trough.
Step 3: Allow sufficient drying time and follow recommended exposure times for proper stencil development.
Effect Insight
The screen coating process influences the final Screen Printing dying shirt effects.
5. Perfect Your Registration Process
Set up registration marks on screens and fabric for alignment. Fine-tune screen positions for accurate color registration, regularly checking and adjusting during the printing process for precision.
Step 1: Set up registration marks on both the screens and the fabric to guide alignment.
Step 2: Fine-tune the position of each screen to ensure accurate color registration.
Step 3: Regularly check and adjust registration during the printing process for precision.
Transfer Aspect
Accurate registration is crucial when considering Screen Printing transfer methods.
6. Control Ink Consistency
Stir the ink well to get a consistent texture. Adjust viscosity to the desired value with additives. Test the ink consistency on the scrap before printing to avoid problems. The weight of the ink always affects the effect of dying on the canvas.
Step 1: Stir ink thoroughly to achieve a consistent texture.
Step 2: Adjust ink viscosity using appropriate additives to achieve the desired thickness.
Step 3: Test ink consistency on a scrap fabric before actual printing to avoid issues.
Dying Effect Connection
Consistent ink thickness influences the Screen Printing dying effect on garments.
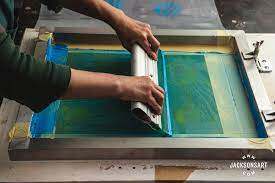
7. Practice the Proper Flood and Stroke Technique
Flood the board thoroughly and evenly to cover the entire design. Make decisions and even strokes to set the ink. Continue to repeat the flood and stroke process for each print.
Step 1: Flood the screen smoothly and evenly to cover the entire design.
Step 2: Execute a decisive and even stroke to transfer the ink to the fabric.
Step 3: Repeat the flood and stroke process consistently for each print.
Advantage Reminder
Proper technique contributes to achieving high-quality prints, justifying the Screen Printing advantages.
8. Invest in a Reliable Flash Cure Unit
Purchase a flash cure unit suitable for your needs. Position it appropriately to speed up the curing process, ensuring the durability and longevity of prints. The initial investment may impact costs but offers long-term advantages in production speed and efficiency.
Step 1: Purchase a flash cure unit suitable for your production needs.
Step 2: Position the flash cure unit at the appropriate distance from the printed garment.
Step 3: Utilize the flash cure unit to speed up the curing process, ensuring durability and longevity of prints.
Cost and Advantage Fusion
The initial investment in a flash cure unit may impact Screen Printing shirt costs but offers long-term advantages in production speed and efficiency.
Conclusion
Screen printing is an ongoing journey marked by precision and innovation. By adding insight to our eight pro tips, you’re not just speeding up your projects but raising the essence of your writing. From mesh complexity to substrate quality, each method plays an important role in achieving rapid perfection. As you apply these lessons, embrace the curriculum, and adapt it to your unique projects, your screen printing efforts easily become skillful and creative. Let these tips take your craft to new heights, and make sure every print you make reflects your mastery of dynamic screen printing.
(FAQs)
Below are three frequently asked questions about Screen printing projects.
1. Why is maintaining optimal tension crucial in screen printing projects?
Maintaining optimal tension is essential for achieving sharp and consistent prints. It ensures uniform results across all screens, minimizing blurring and inconsistencies in the printing process.
2. How do I incorporate stability for top-tier results in my screen printing projects?
To enhance stability and achieve top-tier results, follow the tips outlined in the article. These include regularly checking and adjusting screen tension, investing in high-quality screens and mesh, and mastering the art of screen coating for precise stencil development.
3. How can I apply the insights from this article to my unique screen printing projects?
The article provides practical step-by-step guides for various aspects of screen printing, such as fabric and ink selection, screen tension adjustments, and mastering coating techniques. Tailor these insights to your specific projects by considering factors like fabric composition, design intricacy, and color impact on the final print.